


If you’re just starting out with mobile photography, you should master these twelve techniques before anything else. Even if you’re an an accomplished iPhone photographer, you may well find that some of these tips and tricks have passed you by.
So, let’s get started with everything you need to know for taking amazing photos with your iPhone!
1. Clean The Lens
Your iPhone spends a lot of time in your pocket, a bag or in your hand, and as a result it will get dirty. Dirt, dust, grease and fingerprints on your lens will have a big effect on the quality of your photos.
There’s no point trying to take great photos if the glass of the lens is dirty. It will block light from entering the camera’s sensor and will leave smudges, blurs or dust spots on your images. A clean lens will ensure you get sharp, clear images with your iPhone.

You should clean the lens each time you take it out to take a photo. Use a soft lens cloth when doing this as any abrasive cleaners will scratch the glass over the lens and this will result in poorer image quality.
2. Set The Focus
The most important thing to look out for when taking a photo is to make sure that your subject is in sharp focus. To set the focus on the iPhone camera you simply tap the screen where your subject is in the frame. A small yellow square will appear to confirm the focus point.
If your subject is moving around, make sure you tap the screen just before you take the shot to ensure that they are in focus.

Once you’re happy that you have gotten a sharp photo of your subject, you can draw more attention to them if you wish by using one of the many apps available to blur the background as part of your editing process.

3. Adjust Exposure Manually
When you tap on the subject to focus on them, the camera will also use the focus point to set the exposure in the shot. Exposure simply refers to how bright or dark the image is.
Allowing the camera to set exposure on the focus point isn’t always ideal. For example, if the subject is in a dark area of the frame, this could lead to the overall image being over-exposed (too bright) or vice versa.
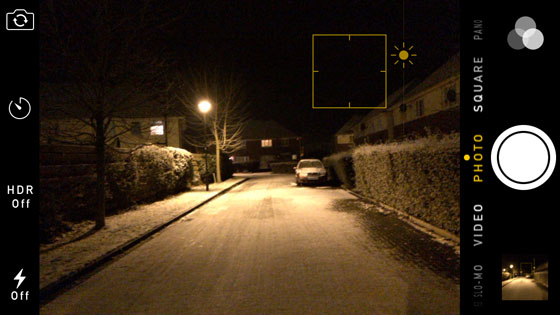
In iOS 8, Apple introduced a new manual exposure tool. When you set the focus by tapping the screen, a small sun icon appears on the side of the focus square. When you see the sun icon, simply swipe up or down on the screen to adjust the exposure slider.
Swiping up will brighten the overall image, and swiping down will darken it. When you’re happy with the exposure/brightness of the image, release your finger from the screen. This manual exposure slider allows for much greater control over the look of the final image.

4. Don’t Use The Zoom
The iPhone has a zoom function which you can access by pinching or stretching two fingers on the screen. This brings up a zoom slider which you can slide with your finger to zoom in and get a closer view of your subject.
Unfortunately this is a digital zoom and not an optical zoom. In essence what happens with a digital zoom is that the image is cropped as you zoom in. This results in a noticeable loss in image quality the more you zoom in.
If you want to take a photo of a far away subject, don’t use the zoom. Walk closer instead and use the camera as normal without any zoom. You’ll end up with a far better quality shot.
Alternatively you can crop the image yourself in the editing process to bring the viewer closer to your subject. Cropping afterwards gives you more control over how much of the image you want to remove.

In this example the lighthouse and boats were on the far side of the harbor and looked very small in the original image. As I didn’t have the choice of walking closer to get a better shot, I just cropped the image to make it look like I was closer than I was.
5. Keep Your Camera Steady
Keeping your camera still is particularly important when taking photos in low light or at night. When you take a photo in these conditions, the iPhone camera will need to use a slow shutter speed to allow more light to hit the sensor. The problem with this is that any movement of the camera will result in a blurred image.

To avoid blurry iPhone photos you should hold the phone with both hands or rest it on a solid surface to keep it steady. You could also use a tripod. There are a number of tripods designed specifically for the iPhone such as the GorrillaPod by Joby.
When using a tripod, you can be extra careful by using the timer button on the left-hand side of the camera screen. Place the camera on the tripod and set the timer to 3 seconds.
When the photo is taken you won’t be touching the phone at all which means the camera will be perfectly still when you take the shot. This is taking things to extremes but could be useful in some very low light situations.

Another trick here is to connect your headphones to the iPhone and use the volume buttons on the headphones as the shutter release. This means that you can put the phone on a tripod and take a shot with physically touching it, avoiding any chance of camera shake.
6. Use The Rule Of Thirds
Getting focus and exposure right is crucial in photography, but composition is equally important. Without good composition, your photo isn’t likely to be very eye-catching.
The rule of thirds is one of the most useful composition techniques in photography. It’s an important concept to learn as it can be used in all types of photography to produce images which are more engaging and better balanced.
The rule of thirds involves mentally dividing up your image using two horizontal lines and two vertical lines, as shown below. You then position the important elements in your scene along those lines, or at the points where they meet.
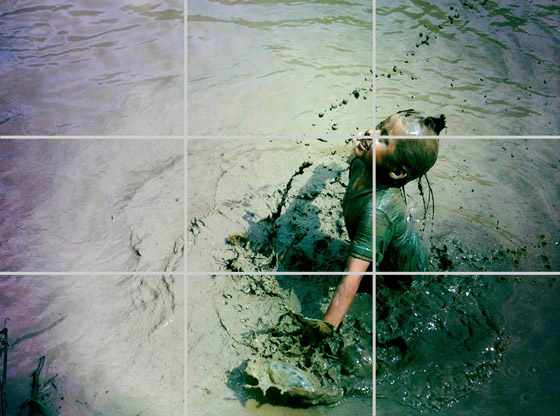
You should try and put your subject in line with one of the vertical lines. If there is a horizon in your photo, it should be in line with one of the horizontal lines. The idea behind the rule of thirds is that the off-centre composition makes for a more interesting shot.
On the iPhone you can place a grid over the screen which will help you when you’re trying to compose a shot. To display the grid, go into Settings, Photos & Camera, then turn the Grid on.
These tips should help you on your way to taking much better photos with your iPhone. Some of the tips, such as using leading lines and the rule of thirds, will be useful no matter what type of camera you use. The most important thing to remember is to keep taking photos and have fun!


0 Comments